Note: full Juniper code for this tutorial is available here: https://github.com/calebh/cwatch/tree/clockonly/jun
In this tutorial we will walk through the architecture and design of a small Juniper project: a DIY Smartwatch running on the Adafruit CLUE Board. We will cover important concepts, like how to interface with existing C++ code/drivers and new features like pattern matching. Since the CLUE Board does not contain long-term memory, and the clock does not run while powered down we will have to synchronize time and date information with an external source every time the board starts. This will be accomplished via the CLUE's Bluetooth Low Energy functionality in conjunction with a smartphone app.
Let's begin by defining a module named Arcada.jun. This module will act as a wrapper around Adafruit's Arcada library which we will use to control the CLUE's screen. We begin by giving the name of the module, then include the Arcada header file. When Juniper transpiles to C++, this header will be included via a C++ preprocessor #include statement. Since Juniper transpiles to C++, Juniper includes the ability to write inline C++. Here we are writing inline C++ to define a global variable called arcada. This globally defined object will be used by the methods we now define in the module:
The arcadaBegin, displayBegin, and setBacklight functions utilize the global variable by calling its methods. Like before, the inline C++ is contained within the number/pound/hashtag sign (#). When used as an expression, a block of inline C++ has access to all Juniper variables and is free to mutate them. The Juniper compiler takes care to minimize name mangling. We can see this in action in the arcadaBegin function, where we mutate the ret variable with the result of calling the C++ method arcada.arcadaBegin. The return value of an inline C++ block is the unit value.
We now define some functions for getting information about the width and height of the screen from the Arcada object. Like before, we are using inline C++ which mutates the local variables defined in the function.
Finally we have some functions for creating a double buffer and swapping the two buffers. Double buffering will allow our smartwatch to display text and other information without any screen tearing.
We now make a new module called Gfx.jun, open up the Arcada module and the Color module (which is included in the Juniper standard library). We include the relevant C++ headers, one for performing graphics operations with the Arcada library and two font definitions. The C++ drawing library is designed to be stateful. This means that to draw text with a certain font, we first must set the font and then draw the text. The body of the setFont function pattern matches on the input font, and based on that value sets the arcada font.
The primary function we will be using to draw the gradient background is the Arcada drawFastHLine, which fills an entire horizontal line of pixels with a given color. The color is given as an RGB565 uint16 (this is also known as 16-bit RGB).
Here we also encounter our first use of the two primary ways to represent textual data in Juniper: charlists and string. charlists are lists of ASCII characters and can be mutated via the various list manipulation functions. charlists are used when we want to create text dynamically. If we look at the definition of charlist inside Prelude.jun (part of the Juniper standard library), we can see that it is a type alias:
Type aliases are a way to give shorter names to types to use in our program. Type aliases are automatically expanded where they are used by the Juniper compiler. In this case, we see that the charlist type alias is generic over an integer parameter. This introduces a new feature of Juniper: type level integers that are known at compile time. This is in fact a limited form of dependent types: we can write integers in the type level, do basic arithmetic operations on them, and use them in expressions at the value level. However we cannot promote integers at the value level to be used at the type level. In this case we can see that our alias is polymorphic over an integer parameter, and will create a list of capacity n + 1. This will ensure that we will always reserve a single byte for the terminating null character. This will allow us to easily use charlists when interacting with C/C++ libraries.
A list is also an alias, but this time for a record type. A record type is defined based on the names and types of its fields. In this case a list has a data field containing an array of fixed size and the number of elements in the list. We can therefore see that the list has an upper bound of n elements, but has a dynamic length.
Turning attention back to printCharList, we see that it consists of an inline C++ block that draws a charlist on the screen be passing a pointer to the first character in the list.
How is the string type different from charlists? The string type is for non-mutable strings - strings that are fixed and known at compile time. These strings are stored in the program memory by the compiler whereas charlists live on the stack or heap. Immutable values of string type are declared using double quotes ("), whereas charlist literals are declared using single quotes (').
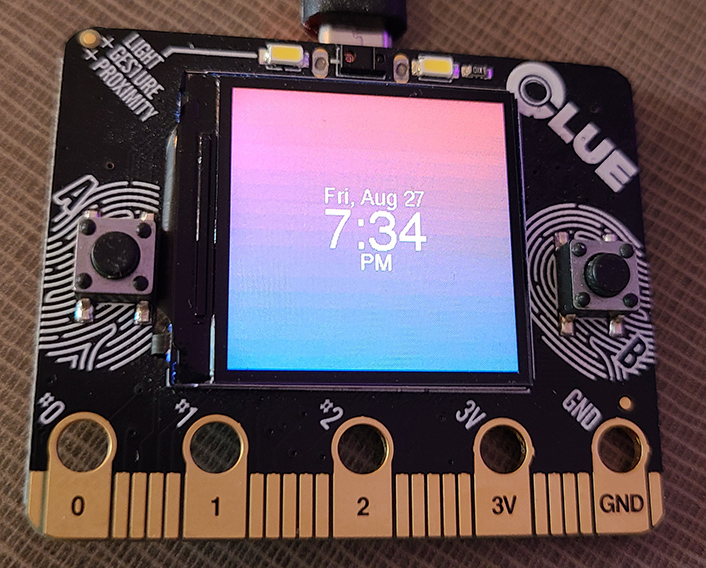
If you look at the picture of the smartwatch at the top of this page, you will notice that the time and date are centered in the middle of the screen. Arcada features a stateful cursor functionality which changes the location of the printed/drawn text. By default text is drawn by specifying the x/y coordinates of the text's top left hand corner. To center the text on our smartwatch face, we will use Arcada's ability to compute character bounds, which will compute the bounding box of a given charlist. We define a function called getCharListBounds returns the bounds as a tuple, and the function setCursor to set the cursor position. This functionality will be used to compute the coordinates at which we will draw the text.
We now define setTextColor and setTextSize functions. The setTextColor function takes a rgb color and converts to to 16 bit RGB565 then calls the appropriate arcada method. The drawVerticalGradient function is more interesting. This function will draw a gradient inside a box at the given input position for a given width and height. The function will interpolate between color c1 and c2. These parameters are RGB colors given by the type alias Color:rgb. This alias is defined to be a struct with three fields (r, g, and b) of type uint8. We can see in this function that we use pattern matching in the let binding to store these fields in local variables. Instead of using pattern matching, we could have used dot notation to extract the fields, such as c1.r.
This function also makes use of Juniper's loops - in this case a for-in loop. Besides the for-in loop, Juniper also has a classic C/C++ style for loop, while loops, and do-while loops. All of these loops are expressions which return type unit. There is no break or continue keyword in the Juniper language. The range iterated over in this example is y0 <= y < y1. In this example the color of each horizontal pixel stripe is computed for each iteration of the loop using floating point arithmetic. We also see the construction of a new record by assigning specific values to each field (r, g, b).