Looking to jump to a specific tutorial in this series? See the links below.
This tutorial is designed to get you acclimated with Juniper as a programming language. We hope that by the end of this guide, you'll feel comfortable with getting started with your first Juniper projects.
All coding samples can be found here:
https://github.com/calebh/Juniper/tree/master/Juniper/examples
Juniper is a functional reactive programming language tailored specifically for programming Arduino devices.
The purpose of Juniper is to provide a functional reactive programming platform for designing Arduino projects. FRP's high-level approach to timing-based events fits naturally with Arduino, with which programming almost entirely revolves around reacting to realtime events. Additionally, since C++ is a very low-level language, Juniper is intended to have better readability on a higher level. Juniper transpiles to Arduino C++, which is then compiled to an Arduino executable.
We designed this language because we believed that FRP was better suited for the Arduino's problem space than C++, thanks to its alternative style and methodology of coding.
As is customary with coding tutorials for new languages, we're going to show to the Juniper "Hello World!" function. Except instead of a computer outputting "Hello World!", the Arduino board with an LED component attached is going to blink the LED on and off every second.
Take a look at this coding sample here:
This is quite daunting if you've never worked in this language before (and even more so, if you've never worked in a function programming language before), so let's break it down, piece by piece.
At line 1, we have the keyword module. Modules are declared files used for storing portions of code. The equivalent in Python would be .py files, and in C++ would be namespaces. Every file used for code in Juniper is a module. At line 2, we have the open() declaration. open() is the equivalent to import * from MODULE in Python, or using in C++. It allows you to use to the declarations and definitions for other data types, functions, and variables that are present in other modules. So Io is a references to an existing module in the Juniper standard library, with resources used in this module. Every module in Juniper also implicitly opens Prelude.
Moving on, we declare certain global variables to be used later in this module. The let keyword allows for the declaration of a new variable. On the right of the equals sign we have the initial value we are assigning to the variable. Since we will be mutating tState and ledState, we must mark these variables as mutable.
In this sample code, the variable boardLed is initially set to 13 (in this code, boardLed represents which pin on the Arduino board the LED is connected to). Since integer literals in Juniper are polymorphic, we need to constrain boardLed to be an unsigned 16 bit integer.
To be more precise, a numerical literal has type a where a : num, where a is a fresh type variable. By adding the type constraint uint16, the Juniper compiler infers that a is equal to uint16, then checks that uint16 is indeed a numerical type. We could have also specified that 13 is a 16-bit integer by using the suffix "u16": 13u16.
Passing parameters as inout are the primary way to pass mutable state. Marking a parameter as inout in a function declaration means that the parameter passed to the function will be passed by reference. This means that mutating the input parameter will mutate the variable passed to the function.
The tState variable is used as a place to record when the timer signal last emitted a value, and ledState is used to hold the current pin state of the LED (if it is on or off). These variables will be mutated by the Time:every and Signal:foldP functions respectively, which will be explained later.
We now have our first function! As in other languages, functions are sets of procedures that take in values as arguments of input, and return a value at the end. The fun keyword denotes the beginning of a function declaration, and the next keyword is the new function name, followed by a set of parenthesis including function parameters (though in this coding sample none of our declared functions have parameters).
The return type of the function is optional and may be given with a colon followed by the return type. In this example there is no return type given, so will rely on type inference to generate it for us.
The body of the function is composed of a sequence expression, denoted with curly braces and newlines. The return result from a sequence expression is the return result of the last expression in the sequence.
Note: Many times in this tutorial you'll see or be using 'Io:' before a function name. This denotes that you are currently using a function from another module, in this case the Io Module. This applies to any module you create and want to use. Indicate the module name first, then a colon, then the function or variable you're using from that module.
Signals are the fundamental building block of our FRP programs, so understanding how they work is very important. In FRP signals have the following properties:
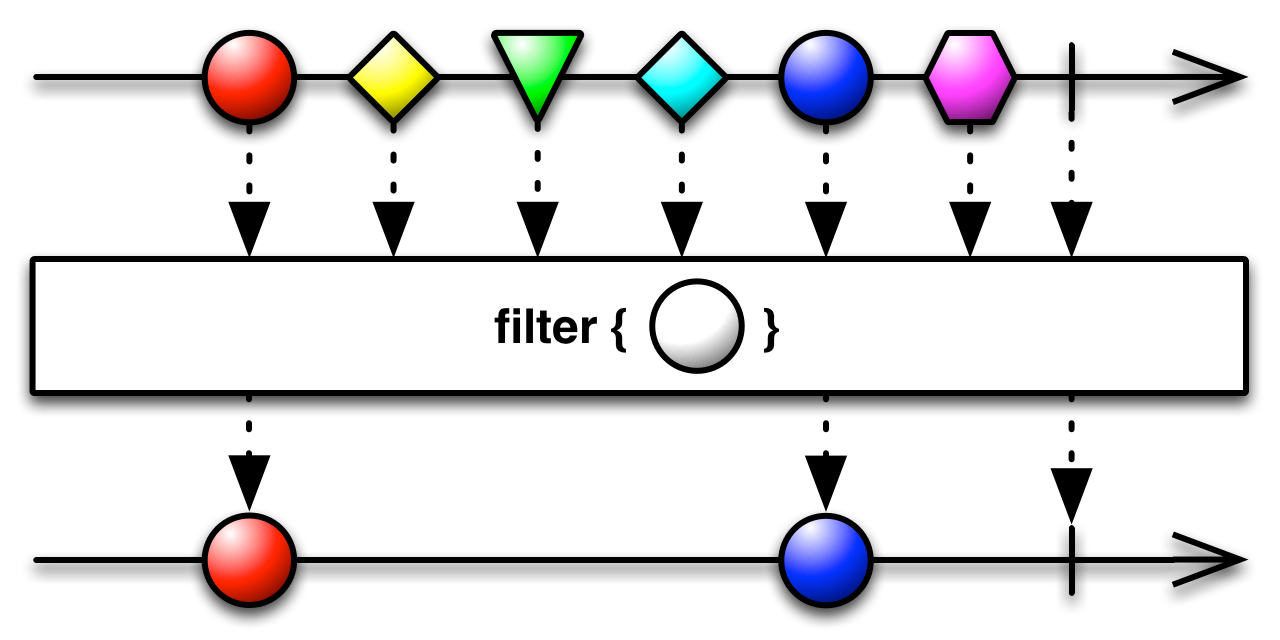
The following picture illustrates a picture of a signal being transformed by a signal processing function. In this case time is shown along the horizontal axis and the filter operation is applied to the input signal to transform it into another signal.
The fundamental observation that the developers of Juniper made was that at any one time slice, a signal may be in one of two states:
We can therefore model a signal with a maybe/option type. Taking a look at the Juniper Prelude module, we can see that the definition for sig is very simple:
Therefore the behaviour of the Time:every function is very simple. In our program, every 1000 milliseconds the timerSig value will hold the current time (since the board started), and on all other invocations the signal will hold no value. The inout state passed to Time:every is used for internal bookkeeping, namely tracking when the timer last emitted a value.
As an aside, we've just introduced another fundamental feature of Juniper: algebraic datatypes, also known as tagged unions. This feature will be familiar to users of statically typed functional programming languages, and can be found in other modern languages like Rust. In the type declaration given above, the maybe type is polymorphic (generic), and has two possible value constructors. The first constructor is called just, and takes a single argument. The type of just is (a) -> maybe<a>, which is a function type. As a concrete example, we can use just(90i32) to construct a maybe<int32> value. Also note that the nothing function is polymorphic and has type () -> maybe<a>. Turning our attention to the definition of sig, we observe that it is merely a wrapper around a maybe value.
The setup() function later also functions is a very similar fashion it is intended to return a unit type, and the Io:setPinMode() function also returns a unit. This function is intended to set a pin on the Arduino device as a location for input (like a button) or output (like a LED). It takes in as arguments the relevant board pin and the intended pin mode (input(), output(), or inputPullup(), just as they work with regular Arduino programming), and sets the pin mode.
The unit type is a type with a single constructor that takes no parameters. Therefore there is exactly one value of type unit. Like many other functional languages, the expression () is the value of type unit.
Let's now take a step back to look the code, because this will be a crucial part of FRP for the Arduino: folding over time. If you're not familiar with functional programming too much, folding is a common operation where you accumulate a single variable based on a function acting on an initial value for it, and each successive element in a list. For example, one can sum up a list of numbers by setting the function to an addition operation, the initial value to 0, and the list to said list of numbers.
In functional reactive programming, we have the foldP operation, which folds based on a signal that updates by events, rather than a list of values. Every time an event is present on the input signal, foldP invokes the passed function, giving it the previous accumulated value and the value on the signal as input. This computes a new accumulated state, which is stored in the passed inout variable and also outputted in the return signal. To see the type signature of foldP, see the standard library documentation here.
In functional programming having functions treated as first-class values is a major benefit. We use parens with comma delimted input parameters followed by an arrow => to define a lambda. In our example we pass a lambda function into the foldP, where the first argument is intended to be an event that traveled along the signal, and the second argument is the current accumulator. It returns the new accumulator value. Our lambda takes in the timer signal's value, and the last led pin state as lastState. It then returns Io:toggle(lastState), which simply returns the opposite digital state of the one given.
Keen observers will notice that another interpretation of foldP is a state machine. The machine recieves an input signal, which is passed to a transition function which takes as arguments the value on the input signal and the current state. The transition function computes a new state, and this is sent on the output signal. As mentioned previously, the state of the machine is stored in the variable passed as inout, which in our example is ledState.
So, to sum up this use of foldP, given a timer signal that triggers an event every 1000 milliseconds, an initial value of the initial ledState pin state (which, in this example, is low voltage), and a lambda we build to simply toggle the pin state by events triggered, we fold in time by checking whenever this loop() function is called if a new event has been triggered by our timer signal (1000 milliseconds/1 second has passed). If it has, we toggle the pin state. At the end of our loop() function, we output the ledSig to the output pin.
The setup() and loop() functions operate similar to the Arduino setup and loop functions. The setup() function is called once before anything else executes, and the loop function is executed inside of a tight while true loop. The loop function is therefore run endlessly until the Arduino is turned off. In our code every time the loop function is run the timer signal is recomputed. When a second has passed, the LED is blinked on or off, depending on the previous state.
And there you have it! Our first program! I hope we didn't scare you off, because this is quite the daunting Hello World example, but once you understand the methodology, and begin to get acclimated to functional programming on the Arduino platform, you'll find that as projects get bigger, the code becomes more intuitive to write than the C++ equivalent versions. The code is more readable, and events are handled more in line with how most of our minds work through these Arduino projects. It also composes really well, which means that adding new components to the project will require very little restructuring.
Further in this tutorial we'll go more in depth on the different concepts in this language, many of which that we've begun to explore in this first example project.